Tuesday, November 26, 2013

// // Leave a Comment

How To Customize Blog Post Sub Heading & Minor Headind

How To Customize Blog Post Sub Heading & Minor Headind

Hi, After write my previous articles today i am gonna share how to customized blog post sub heading and minor heading.

Just Follow This Step

  • Login your blogger account
  • Click on Template
  • Edit Html
  • Expand Widget Template
Now find this code
]]></b:skin>
After finding the this code paste the following codes before ]]></b:skin>

Subheading Code


/**Subheadng by www.tonyisright.blogspot.com**/
.post h3 {
background: url("https://blogger.googleusercontent.com/img/b/R29vZ2xl/AVvXsEgJd6hRxX4-ajfSvd3XY-v3j0rEIV5SClVHYgrMsps6V__8PmM53rVLyWpNfZJdEN7Pg9QtOZ7kPP3-bODH5rd2WviGDfg5kVHf9JMPkdvg9nwdQ1aQvaDAFelfibzVhOGQtBlnequpK2c/s400/BS%252BPostTitle%252B1.png") no-repeat scroll 4px center transparent;
font-size: 20px;
font-family: "Trebuchet MS",sans-serif;
text-align: left;
font-weight: bold;
width: 570px;
padding: 3px 10px 3px 30px;
color: rgb(165, 165, 3);
border: 3px solid rgb(200, 200, 0);
text-shadow: 0px 1px 0px rgb(204, 204, 204);
border-radius: 60px 60px 60px 60px;
box-shadow: 0px 1px 3px rgb(198, 198, 198), 1px 1px 0px rgba(255, 255, 255, 0.4) inset;
margin: 15px 3px;
text-transform: uppercase;
line-height: 1;
}

Change the Blue color URL with our desire icon and save the template.

Minor Heading Code

/**Minor Heading by www.Tonyisright.blogspot.com**/
.post h4 {
background: url("https://blogger.googleusercontent.com/img/b/R29vZ2xl/AVvXsEj7OdXAfzvc3ZE2hcABIByAaskZjxS-h7f8qT_xmVS0oNRYlhwb4Vx7yDYQwN3TjIS2wjfGetc14SsvQCzPBAM9AmcihSSleuXUsyo_SPmKL78X8ejSVyfZTjrd_qF6P5xBeKQvlZ7kUBQ/s400/BS%252BPostTitle%252B2.png") no-repeat scroll 5px center transparent;
clear: both;
color: rgb(102, 45, 45);
font-family: "Trebuchet MS",sans-serif;
font-size: 20px;
font-weight: bold;
line-height: 1;
margin: 10px 5px;
padding: 6px 10px 2px 40px;
text-transform: none;
text-shadow: 0px 1px 0px rgb(204, 204, 204);
}

Change the Blue color URL with our desire icon and save the template.

you have done. !

If you need any help please comment below and keep visiting.

Read More

Monday, November 25, 2013

// // Leave a Comment

How to register and link your website to Google Analytics

In this article I am going to tell you how to register and link your website to Google Analytics with introduction of many more features.

How to register and link your website to Google Analytics


Step-1:


First login into your Gmail account and click on below mentioned link to register with Google Analytics.

Google Analytics to Register

Now click on Login button, it will redirect you to signup page. You can also click on below link to go to signup page directly.

Click Here to Sign up

Step-2:


Here Website tracking option and Universal Analytics option will be selected as default. You don’t need to change this option.

Step-3:


Fill the below mentioned details in the form. Sample data has been given for your reference.


  • Website Name: Info Blog Maz
  • Website URL: http://Tonyisright.blogspot.com
  • Industry Category: Other
  • Reporting Time Zone: Pakistan (GMT+05:00) Pakistan Standard Time
  • Account Name: Info Blog Maz (Name which you like)
  • Select all the options and click on Get Tracking ID, select Pakistan license term and click on I Accept.
  • Now you will get a tracking ID like UA-XXXXXXXX-X and a script code.

Incorporate this script in your website and verify your website. Now your website is successfully registered and linked with Google Analytics.


Now you can check following things in your Google Analytics account.

In MY STUFF you can access following feature.


Read More
// // Leave a Comment

Add Flash Clock To Blogger Blog


Add Flash Clock To Blogger Blog

Today i am sharing this article how to add a flash clock to blogger blog.
  • Login to your blogger dashboard--> Layout-->'Add A Gadget'
  • Choose Html/Javascript Gadget and add the one of code given below : 


<object><param name="movie" value="http://flash-clocks.com/free-flash-clocks-for-websites/free-flash-clock-23.swf">
<embed src="http://flash-clocks.com/free-flash-clocks-for-websites/free-flash-clock-23.swf" width="150" height="150"
wmode="transparent"> </embed></object>


<object><param name="movie" value="http://flash-clocks.com/free-flash-clocks-for-websites/free-flash-clock-33.swf">
<embed src="http://flash-clocks.com/free-flash-clocks-for-websites/free-flash-clock-33.swf" width="150" height="150"
wmode="transparent"> </embed></object>

<object><param name="movie" value="http://flash-clocks.com/free-flash-clocks-for-websites/free-flash-clock-58.swf">
<embed src="http://flash-clocks.com/free-flash-clocks-for-websites/free-flash-clock-58.swf" width="150" height="150" wmode="transparent"></embed></object>


<embed height="200" src="http://flash-clocks.com/free-flash-clocks-blog-topics/free-flash-clock-183.swf" type="application/x-shockwave-flash" width="200" wmode="transparent"></embed>

<object><param name="movie" value="http://flash-clocks.com/free-flash-clocks-for-websites/free-flash-clock-63.swf">
<embed src="http://flash-clocks.com/free-flash-clocks-for-websites/free-flash-clock-63.swf" width="150" height="150" wmode="transparent"> </embed></object>

<object><param name="movie" value="http://flash-clocks.com/free-flash-clocks-for-websites/free-flash-clock-15.swf">
<embed src="http://flash-clocks.com/free-flash-clocks-for-websites/free-flash-clock-15.swf" width="150" height="150" wmode="transparent"> </embed></object>


<object><param name="movie" value="http://flash-clocks.com/free-flash-clocks-for-websites/free-flash-clock-8.swf">
<embed src="http://flash-clocks.com/free-flash-clocks-for-websites/free-flash-clock-8.swf" width="150" height="150" wmode="transparent"> </embed></object>

<embed src=http://safir85.ucoz.com/bdlab-blogspot/24work/WorldCupClock.swf width=200 height=200 wmode=transparent type=application/x-shockwave-flash></embed>


  • Save HTML/Javascript you are done.

For more visit: freeflashclocks.com  
Read More
// // Leave a Comment

Add Metro Style Social Widget for Blogger

Add Metro Style Social Widget for Blogger

Today i am sharing this articles how to add beautiful metro style social widget for blogger looks like windows 8 apps.

Adding widget in blogger layout

  • Sign in blogger -
  • Go to layout -
  • Add a gadget -
  • Html/Java script -
<div class="metro-social">
<li><a class="fb" href="Your Facebook URL here"></a></li>
<li><a class="tw" href="Your Twitter URL here"></a></li>
<li><a class="gp" href="Your GooGle + URL here"></a></li>
<li><a class="fd" href="Your FeedBurner URL here"></a></li>
</div>
<style>
/*Metro UI Social Profile Widget v2.0 by Tech Prevue Labs
Web link to gadget code:
Distributed under license CC BY-NC-ND 3.0 INT
Please keep license information intact while using this widget*/
.metro-social{width:285px}
.metro-social li{position:relative;cursor:pointer;padding:0;list-style:none}
.metro-social .fb,.tw,.gp,.fd{z-index:7;float:left;margin:1px;position:relative;display:block}
.metro-social .fb{background:url(//goo.gl/6xmUk) no-repeat center center #1f69b3;width:140px;height:141px}
.metro-social .tw{background:url(//goo.gl/oyiFK) no-repeat center center #43b3e5;width:140px;height:70px}
.metro-social .gp{background:url(//goo.gl/oT0kF) no-repeat center center #da4a38;width:140px;height:69px}
.metro-social .fd{background:url(//goo.gl/ncoLY) no-repeat center center #e9a01c;width:282px;height:69px}
.metro-social li:hover .fb{background:url(//goo.gl/MH8AP) no-repeat center center #1f69b3}
.metro-social li:hover .tw{background:url(//goo.gl/hHRHv) no-repeat center center #43b3e5}
.metro-social li:hover .gp{background:url(//goo.gl/wva4B) no-repeat center center #da4a38}
.metro-social li:hover .fd{background:url(//goo.gl/JFGqn) no-repeat center center #e9a01c}
</style>
<br />


  • Replace YOUT URL with your url -
  • Click on save - 

Enjoy Blogging !


Read More
// // 1 comment

How To Protect Your Adsense Account From Invalid Clicks

How To Protect Your Adsense Account From Invalid Clicks


The majority of Adsense account banned by invalid click because some of Adsense strick policy some of the hate and envious are trying to cancel your adsense account by clicking on your ads several times or use a program that automatically  to close your adsense account then he feels happy , There are also ways like showing your ads on sites contrary to the terms of Google Adsense account , so in this post we will learn how to protect your adsense account from those invalid clicks that by reporting for it.

First fill up the invalid contact form. (look the screen )


Read More

Sunday, November 24, 2013

// // Leave a Comment

Optimize Your Blogger Blog without Any SEO Plugin or Widget

Optimize Your Blogger Blog without Any SEO Plugin or Widget

What is an SEO Plugin?


Some of you might need to know what SEO plugins are. SEO plugins help users a lot to optimize their blogs for search engines. They enable a user to set up meta description for posts and pages, rewrite title and customize permalink setup.


Wordpress blogs have these SEO plugins which help write better content, do page analysis, Technical SEO, control meta & link elements, XML sitemaps functionality,  RSS optimization, edit your .htaccess and robots.txt file, social integration, multi-site compatible, import & export functionality, news SEO.

Seems great, isn’t it? Yes, of course because all these play a vital role in a blog’s SEO.


But what if you have a Blogger blog and ask me “Is there any SEO plugin for blogger?” and I reply you with a big No. You are distressed and dejected. But not! You needn’t be dismal and overridden by gloom as I am going to give you some canny tips and tricks on how to boost search engine optimization for your Blogger blog without any SEO plugins or widgets.

Optimizing Blogger Blog Well for Search Engines without any SEO Plugin


By default Blogger blogs are not well optimized for search engines. However, following four SEO tips and tricks for your blogger blog’s optimization will do what SEO plugins do for WordPress blogs.

1. Enable Meta Description


A new blog on Blogger has, by default, its meta description setting turned off. To enable it for posts and pages you need to turn this feature on from your blog’s dashboard. When you enable the meta description, you will see a box in the post editor of your Blogger blog which allows you to set meta description for all your posts. To enable meta description, proceed as below:
  • Login to Blogger dashboard.
  • Select your blog.
  • In your blog's dashboard, go down to Settings, then select Search Preferences and then Edit the description.
  • When you click on Edit link in front of Description, you will see that Enable search description option is set to No. Change it by selecting Yes to enable meta description.
  • A box will appear in which you can write default description for your blog.
  • Now save the changes you have made and your blog’s meta description has been enabled.

Now after your blogger blog’s meta description is enabled for posts, you can write meta description for all your blog posts in editor while composing the posts.


2. Optimize Your Blogger Blog for Search Engines


Now let’s move to second important step for optimization of your blogger blog for search engines. This tip is about modifying the title of your posts and pages for search engines. This is very vital for SEO of your blog. 

Again in Blogger blog, by default, blog title or name is displayed before post titles which harms SEO efforts for a blog. Follow the step below and remove your blog title from post titles. This will certainly enhance your blog's SEO to a great extent by getting rid of unnecessary and repeated keywords of your blog title from your posts. 


Download a backup of your blog's template and edit its HTML. It provides you with a chance to restore your template if there is something wrong with editing.

Look for <title> in your template code by pressing Ctrl+F and replace 
<title><data:blog.pageTitle/></title> 
with the below code.  
<b:include data='blog' name='all-head-content'/>
<b:if cond='data:blog.pageType == &quot;index&quot;'>
<title><data:blog.pageTitle/></title>
<b:else/>
<title><data:blog.pageName/></title>
</b:if>

You have done it and now Save your template.

This makes your blog title appear only for homepage and all your posts will show their own title without showing your blog’s title again with post titles.

3. Set Custom Permalink for Each Post 


While composing your posts, you must always set the custom permalink for your posts. Don’t leave them for auto-generated permalink. While you are composing posts you can set permalink for your posts and pages from sidebar of the editor. Follow the tip below in this regard:


  • Write your main keywords to set the permalink.
  • Just write important keywords and try to make it short. Keywords in URLs make a great difference.
  • If, by mistake, you publish your post without setting the permalink then edit it quickly before it gets indexed. Revert it to draft, set permalink and then publish it again.

4. Using Keywords in Meta Description


Use keywords in meta description and write a unique and excellent meta description with keywords for your posts. Using keywords in your meta description makes it tempting for visitors and they are likely to click on it in search results.

Hope you learn from this tutorial. Following these four great tips you have optimized your Blogger blog well for search engines without any SEO plugins. 

If you need any further information please leave a comment below your reply will highly appreciate.


Read More

Friday, November 22, 2013

// // Leave a Comment

Add Css Social Widget In Blogger

Add Css Social Widget In Blogger
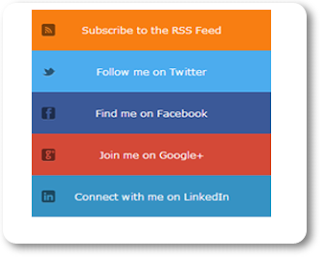
Hi Friends,In this Post i m sharing this css Social widget with hower effect for blogger.Hope you like this widget.This css widget is very cool and stylish.itcontains all the social links like: facebook,twitter,Google+,LinkedIn,Rss feeds,I'm sure that this will tempt your readers to have a look at on your social links.Now,Hurry up add this widget in your blog. Its very easy. just follow the below steps one by one.


How To Add Css Social Widget In Blogger 


  • First for All Go To Blogger.com > Page Elements > Add a Gadget
  • Choose HTML/JavaScript from the list of the gadgets
  • Copy and paste the code below in the content box. 

 <style type="text/css">
.btnt-chronicl-social {  width: 320px;  margin: -10px;  }
.btnt-chronicl-social ul {  margin: 0;  padding: 0;  }
.btnt-chronicl-social ul li {  list-style:none;   padding: 0; text-transform: none; }
.btnt-chronicl-social ul li a {   color: #fff;   display:block;  }
.btnt-chronicl-social ul li a:hover {  color: #c9c9c9;  background-color: #333;   }
.btnt-chronicl-social ul li .rss { background: url("http://i1203.photobucket.com/albums/bb382/chandeep10/social-icons/RSS-1.png") no-repeat scroll 10px center #F87E12; background-size: 20px; padding: 17.5px 45px; }
.btnt-chronicl-social ul li .twitter { background: url("http://i1203.photobucket.com/albums/bb382/chandeep10/social-icons/Twitter.png") no-repeat scroll 10px center #4CACEE; background-size: 20px; padding: 17.5px 45px;}
.btnt-chronicl-social ul li .facebook { background: url("http://i1203.photobucket.com/albums/bb382/chandeep10/social-icons/Facebook-1.png") no-repeat scroll 10px center #3B5998; background-size: 20px; padding: 17.5px 45px; }
.btnt-chronicl-social ul li .google { background: url("http://i1203.photobucket.com/albums/bb382/chandeep10/social-icons/google.png") no-repeat scroll 10px center #D44937; background-size: 20px; padding: 17.5px 45px; }
.btnt-chronicl-social ul li .linkedin { background: url("http://i1203.photobucket.com/albums/bb382/chandeep10/social-icons/LinkedIn-1.png") no-repeat scroll 10px center #3692C3; background-size: 20px; padding: 17.5px 45px; }
</style>
<div class="btnt-chronicl-social">
<ul>
<li><a class="rss" href="http://feeds.feedburner.com/Tonysblaster">Subscribe to the RSS Feed</a></li>
<li><a class="twitter" href="https://twitter.com/Infoblogmaz">Follow me on Twitter</a></li>
<li><a class="facebook" href="https://www.facebook.com/Infoblogmaz">Find me on Facebook</a></li>
<li><a class="google" href="https://plus.google.com/Tonyisrightblogspot">Join me on Google+</a></li>
<li><a class="linkedin" href="http://in.linkedin.com/in/YourUserName">Connect with me on LinkedIn</a></li>
</ul>
</div>

Change all Red words with your Url's.


Replace Tonysblaster with your feedburner Feed ID
Replace Infoblogmaz with your facebook Page ID
Replace Infoblogmaz with your twitter ID
Replace https://plus.google.com/TonyisrightBlogspot with your Google+ ID
Replace http://in.linkedin.com/in/YourUserName with your Linkedin URL

Well Done!

If need any further information please feel free to leave a comment below your reply will highly appreciate.
Read More