Showing posts with label How To. Show all posts

Wednesday, May 28, 2014

// // 1 comment

How To Change Fonts on Android

Changing Fonts are one of the many customizations options which can be done on both Rooted and Unrooted devices and you have plenty of fonts to choose. If you have already rooted your device, you can even add your custom font to the device, and if your device is not rooted, there are still some fonts waiting for you.


Let’s review 4 easy ways to change fonts on Android both on devices requires Root or without root:


Install a Launcher (No Root is Required)


We have talked so much about Android Launchers, and you already know their advantages. Some launchers like Go Launcher, or Apex let you choose a font from a list of available fonts. This method is very easy and the only prerequisite for the installation is to have these launchers installed on your device.

The only disadvantage of changing fonts from a launcher is that, it only affects the parts of the device that are under the authority of the launcher. For example since the main settings of the device remains unchanged after installing a launcher, then you shouldn’t expect to see a change in settings fonts.


Install System Fonts (No Root is Required)


This method is used if your phone supports Font changing feature. For example both Korean companies (LG and Samsung) have some pre-installed fonts and they even let you download more font packages from Google Play. Fonts are changed on the entire menus of the device and if you haven’t rooted your device and you happen to own a Galaxy device, then this is the best and easiest way to change fonts on your device.

Go to Settings…Display…Font Style. There you have 5 options as default fonts. Tapping the “Get Fonts Online” takes you to Google Play and let you download many beautiful packages.


Install from Font Management apps (Requires ROOT access)


Whe n you take the risk and Root your device, you expect to have some accesses and features, which are worth the risk and voiding the guaranty.

There are some font management applications which provide hundreds of beautiful fonts with many options to customize. These Android apps are easy to use and after installation you can choose the fonts you like.

iFont(Fonts For Android) and Font Installer ★ Root ★ are 2 of the best Android apps to change fonts. Make sure your read the developers description before installation to see it your phone is supported or not.

Download iFont from Google Play

Download Font Installer from Google Play

Note that iFont provides some features for Galaxy users which haven’t Rooted their devices.


Manually Add Custom Fonts (Requires ROOT access)


This method is not recommended for those who haven’t got much experience changing system files. By the way, you can find all the installed fonts under this path: /system/fonts. You can replace your custom fonts with already existing ones in this folder. You must rename the font name and know which font you should replace, otherwise the process doesn’t go through.
Read More

Tuesday, May 13, 2014

// // Leave a Comment

How To Make Blogger Template Mobile Friendly

As you know, millions of people use their mobile phones to access internet. The mobile internet speed is also very fast these days with 3G's , mobile apps,etc.

From this, we can say many of your readers are coming to your blog through mobile phones..But, if you don't make your blog mobile friendly, .you may lose all your mobile readers because in a mobile phone, a normal blog takes lot of time to load and there are other issues that your site not fitting properly in the mobile screen.


So, here is how to make your Blogger (blogspot) blog mobile internet friendly..

Sign into your Blogger account > Design > Edit html

Find this line..

<b:include data='blog' name='all-head-content'/>

Paste this code below that line...

<meta content='IE=EmulateIE7' http-equiv='X-UA-Compatible'/>
<b:if cond='data:blog.isMobile'>
<meta content='width=device-width, initial-scale=1.0, user-scalable=0' name='viewport'/>
<b:else/>
<meta content='width=1100' name='viewport'/>
</b:if> 
Save the Changes!

Now you have successfully make your blog template smart phone and other mobiles friendly.

Read More

Monday, May 12, 2014

// // 1 comment

9 Alternative Ways To Access Blocked Sites

Is you school, college or office blocking you from getting on social network sites like Friendster,Facebook, Myspace, Bebo, Hi5, Orkut, etc? Here’s few ways you can bypass the restrictions and surf like normal, but please check with your local authorities before using them. We will not held any responsibility if you’ve breach the regulations of any.

Full list after jump.

Using IP Instead Of URL

This depends on the software/application used. Sometimes blocked sites are stored as a list of URLs (eg. www.yahoo.com, www.donwload.com,etc) and typing the IP instead of the URL might sometimes work. In a local computer, doing a ping www.whatsmyip.org
omain.com command in Command Prompt (Mac users use Terminal) will return you the IP address. You can also do it online via

Redirection With Short URL Service

Sometimes the URL you intend to browse might be ban, but converting them to another a shorter URL with short URL services might just help you to bypass the settings.

Google Cache

Search engines like Google and Yahoo cache webpages and these cached pages are stored in search engines themselves, which likely will be added to the blocked list. Click on the ‘cache’ will bring you to a cache version of the page, as updated as how Google caches it.

Google Cache

Internet Archive – Wayback Machine

Wayback Machine is a internet service that periodically keeps a copy of almost all websites in the Internet way from the date they’re started. Clicking on the latest copy of what Wayback Machine have should be somewhat similar to the real site. Another way to access blocked sites via caches.

Wayback Machine

Use Proxy In Browsers

There are tons of sites out there that distributes free proxies of almost any country. Here’s an example. Check out the following methods on how/where to insert proxies in your web browsers.

Proxy Surfing – Firefox

Proxy Surfing – Firefox


Under Advanced tab, select Network tab, then click inside Connection Settings. Select Manual proxy configuration, put proxy under HTTP proxy.

Proxy Surfing – Internet Explorer


Go to Tools -> Internet Options. Select Connections tab. Click into LAN Settings, check Proxy Server. Insert your proxy URL inside Address.

Bypass With Translations Services

Online translation services like AltaVista BabelFish, Google Translate allows you to translate a website from one language to another and display the translated results on their own page.The trick here is to enter the URL (website you’re blocked), retranslate it even if you don’t need to and let Google or AltaVista fetch you the content.

Subscribe To RSS Feed

This might not work for all sites, but if the site you intended to visit provides RSS feeds, you can subscribe and read it with a RSS reader, or have it regularly send the contents to your email

Retrieve Web Pages Via Email

Web2Mail is a free service that sends websites you want to read right into your inbox. All you need to do is send an email to www@web2mail.com with the URL as subject title.
Read More

Monday, May 5, 2014

// // Leave a Comment

How To Clear All Traces Of Your Internet Activity

[Windows only] Everyday we perform hundreds of activities on Internet and each activity actually has been recorded down in a form of cookies, logs or temporary internet files. Some of these files are useful, but some actually do harm. It would be safe to clean out unwanted traces of your online journeys and keep you Internet privacy after accessing some security website, for example, online banking website.


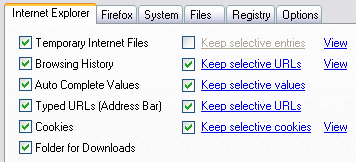
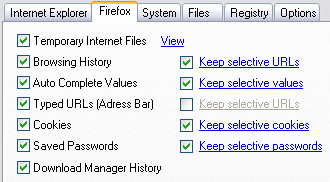
IE Privacy Keeper takes the burden of sweeping up the crumbs by making sure no one will know the web sites you’ve visited, or the search queries you’ve made.
Regardless you are using Internet Explorer or Mozilla Firefox, IE Privacy Keeper automatically cleans up the browser history once you are done surfing the net. The program will correctly clean up all index.dat files without the need for a Windows restart.


You can specify custom files and registry keys to delete. IE Privacy Keeper has secure deletion feature to prevent data recovery and conceal the cleanup.

You can keep selective items in the browsing history and hide the program form the list of running applications. Secure deletion will make any attempts to recover deleted items fail.


Here are some key features of “IE Privacy Keeper”:


  • Cleans up Internet Explorer and Mozilla Firefox history
  • Cleans up index.dat files without the need for a Windows restart
  • Keep selected items
  • Cleans up your offline activity traces
  • Cleans up custom folders and registry keys
  • Automatically cleans up when IE or Firefox exits
  • Various notification methods
  • Secure deletion

Did I say that IE Privacy Keeper is absolutely free?

Read More

Friday, May 2, 2014

// // Leave a Comment

How To Share Dropbox Files On Your Facebook Group

Just two weeks after the announcement, Dropbox has fully implemented its integration with Facebook Groups. With this, instead of choosing files from your computer to upload to your Facebook Group, you can select files from your Dropbox account to be shared to your group.


In this article, we’ll be showing you how to start sharing files from Dropbox to members of your Facebook Group.

Add Dropbox Files To Your Facebook Group

This option is not available on the regular post box when you enter your Facebook. It is an option that is available in Facebook Group only (for now). When you want to add a file to your Facebook Group, you’ll be able to see the ‘Add File’ option. Click it to start sharing your file.


Under ‘From your Dropbox’, click the ‘Choose File’ button. You’ll get a permission request from Dropbox to access some of your Facebook information. Click Allow to continue.

You’ll then be prompted to login to your Dropbox account with your email and password.


After logging in, you can browse through your Dropbox files. Select one file to share on your Facebook Group.


After you hit Select, you will be able to add a message to accompany the file, just like a regular Facebook post.


Your file is now shared on the wall of the Facebook Group. Members can click on the link to download the file to their computer.


When group members click on the shared link, they’ll be taken to a Dropbox webpage where they can download the file. They can preview certain files that the Dropbox website supports (pictures, videos and basic text files) before downloading.


Just like any other post on a group, group members will receive a notification of the wall post. Members of your Facebook Group do not need to have a Dropbox account to download the file.

Note that anyone outside of the Facebook Group can also download this file provided they have the link from your Facebook Group wall.

Privacy Of The Dropbox/Facebook User


When you share your Dropbox files on Facebook, Facebook does not have any access to your Dropbox account information or files. When you add a file to the Facebook Group, Facebook only receives the name and size of the file and a download link.

On the other side of the fence, Dropbox only receives your basic information from Facebook to confirm your identity and uses your email address only to identify your Dropbox account.

The members in your Facebook Group also cannot edit or add anything to your Dropbox account. They only can download the one file you have shared. And when you share a file to the group, the link is secured with a Dropbox token, so that even if a person without access to this link guesses the token, they need to identify the file and folder it is in to be able to download any particular file. A simple file name change to the document would render the link unusable.

These privacy measures established between the two services will put your security worries to rest.
Read More

Thursday, May 1, 2014

// // Leave a Comment

How to Make Skype Multi Login

With every version , Skype has added a new switch for supporting multiple users on a single PC. The following steps would show how to create a new shortcut for starting a new Skype instance with a different Skype user account.


  • Open Windows Explorer and go to “C:\Program Files\Skype\Phone.”
  • Right click on the Skype icon and select “Create Shortcut.”
  • Right click on the new shortcut and select “Properties.”
  • Append ” /secondary” to “Target” to become ‘”C:\Program Files\Skype\Phone\Skype.exe” /secondary.’
  • Click OK to save the change.
  • Give the new shortcut a new name and move it to anywhere you desired.
  • When you click on this new shortcut, a new Skype window will appear and you can log on using another Skype account.


You can also run the new Skype instance under another Windows user account. Right-click on the new icon while holding down the shift key, then select “Run as.” See below for more details.

Setting up multiple Skype account on a PC

You have a Skype account on your computer, but so does your wife / husband, and so does your kids? None of you want to miss your important Skype calls from your friends. There is no need to fight over who should / shouldn’t be logged-in on your only computer at home. So here is the way around the brewing storm:

Build up a new user account in Windows XP:

1. Start -> Control Panel -> User Accounts -> Create a new account (Under Pick a task.)
2. Key-in your new account name in the “type a name for the new account:” box -> Next
3. Click Computer Administrator -> Create Account

Give the account you just created a password:

1. Start -> Control Panel -> User Accounts -> Left-click on the new account you just created.
2. Left-click on Create a password -> Enter the password two times and enter the password hint -> Create Password

Run the second Skype program using the new account you just set up:

1. Right-click on the Skype Icon on your desktop while holding down the shift key -> Left-click on Run as
2. Click The following user -> Choose User name and enter password / OK
Click on the New Users – Create a Skype Account tab if you need to register a new user in Skype, and follow the instructions on screen.
Click on the Existing Users – Log in to Skype tab if you already have a second account, and follow the instructions on screen.
Hope You Will Enjoy.  Have Fun.

Read More
// // Leave a Comment

How To Disable YouTube Video Autoplay [Quicktip]

As video junkies would attest to, sometimes you want to open more than just one video at the same time, to let the video load up first before you play it one shot.


And those who use this tactic would understand how annoying it is for a video to auto play when buffering has yet to complete, especially when you have several loading and you have no idea which tab is playing and which is not. This article will introduce to you a few browser extensions to help you stop the Youtube auto play feature.

Stop Youtube Autoplay On Chrome

If you are using Chrome browser, head over to get the Stop Autoplay For Youtube chrome extension. Add to Chrome.


Once the installation complete, it just works! Open any Youtube video from your Chrome browser and you will see that the video would not play until it is fully loaded.

Click To Load And Play

If you prefer to be in control and only let a video play only when you want it to, you can choose to activate "Click to play" on your browser. This works with your Opera and Chrome browsers.

1. Opera

For Opera, open your browser, go to Preferences.


Now go to Advanced tab, look for the Content section at the left bar, check option for Enable plug-ins only on demand then click OK.


2. Chrome

If you are on Chrome browser, type chrome://chrome/settings/content in the address bar and enter. After the settings page appear, scroll down and look for the Plug-ins section, and change the option to Click to Play.


With all this set in Opera and Chrome, whenever you open a new video on Youtube, it will not load nor will it play, until you click the big button on the video screen.


3 Firefox

For Firefox, go to Tubestop extension page and install the extension to your browser.


Once installation is complete, all videos will not be played or loaded, until you click on the link on the video screen.


Read More
// // Leave a Comment

How To Disable Metro UI in Windows 8

The metro style UI is the new breakthrough user interface that Microsoft has offered along with its new Windows 8 operating system but sadly it has not come up to everyone’s liking. Removing it will render the new OS unstable and rather unusable. So here I outline some ways to remove this new add on without permanently scarring the system. All the methods outlined below are totally reversible.

It is important to know that the following methods men changing registry values and in doing so you can bring harm to the system if you make a mistake. Windows 8 is still in a preview only mode, not even in the public beta. Primarily this is a version to get the developers familiar with the new environment and give them an idea on what to expect.

Here are my previous articles on Windows 8 Screen:

One who has already used Windows 8 knows that if you exit the new Metro UI, a classical windows 7 interface lurks beneath it. The main difference being that now the start button launches the Metro UI instead of the start menu. Following this tutorial will let you configure the start button to disable the metro UI and to call upon once more the classic windows 7 style start menu. You may revert back any time by reversing the process. Here is how you can get the classic menu:

Steps To Disable Metro UI in Windows 8


  1. First, press the Start + R buttons, to open the Run menu.
  2. In the Run window, type “regedit” and hit Enter.
  3. Now scroll on the top of the list and double click on “HKEY_LOCAL_MACHINE”. This will expand the folder.
  4. Do the same for “SOFTWARE “.
  5. In the list, search for “Microsoft” and open it.
  6. Now using the same procedure, navigate to Windows->CurrentVersion->Explorer and some registry entries will appear in the right side of the screen.
  7. Click on the one called “RPenabled” and change its value from “1″ to “0″.

This will cause the metro UI to be replaced with a familiar looking Windows 7 start menu. To revert this all you need to do it to change the value of RPenabled back to 1.


If this seems too hard one can always download a program called start menu selector available from DeviantArt that is a portable utility to switch between these two menus with the click of a button. This software basically just does the same steps detailed above.

Simply download the program from the website, extracts the folders contents and click the executable. This also adds a quicker option for switching between menus when you right click anywhere on the desktop. To ensure that it gets the job done make sure that you use it with admin privelages.
Read More
// // Leave a Comment

Change Windows 8 Logon Screen Background Image

Windows 8 comes with a background image of a subtle green shade. But as it stands not every user might like this same image to be seen each and every time they log into any windows 8 computers. To truly customize your machine beyond the masses you have too at least set a custom background image for Windows 8 logon screen and Windows 8 Metro start screen background.


The windows 8 green pixelated image is pretty cool but surely one would get bored of it after using the system for a couple of weeks. Your family picture, your pet, your favorite music band are a few options.

To truly change your boring old Windows 8 Metro screen background, give Windows 8 Start Tweaker a try. It’s a portable utility that can be used to change your Windows 8 start screen and also choose as the color of your choice for the Windows 8 logon screen.

Change Windows 8 Logon Screen


To do this you just have to extract the small program and run it as administrator and browse to the location of the image you wish to use. Note that the program has Chinese as the default language and to use it in English you will have to select the US flag option.


When you have chosen the custom image of your choice for your Windows 8 Metro background and the color of choice for your Windows 8 logon screen, simply log out and back in to see the effective changes.


If you do not like the new Metro UI then there is always the option to revert back to the older Windows 7 start menu interface. Untill the release of a stable version of the new OS I recommend using the classic windows style for important work and dwelling on the new look only in spare time.

To ensure the best fit of the custom background image make sure that the image you use is twice the current resolution of your screen. This will make sure that the image fills the whole background and not just a part of it.
Read More
// // Leave a Comment

How to Clear History cache in Chrome Browser in Windows

First of all go to top of the browser menu customise and control google chrome
then go to history tab if you like to use short key then press CRTL + H you will directly go to the history tab.


Simply Click on clear browsing day as shown in the image.


Then select all all the data as you need to clear or leave some thing as you like select duration of history to clear then click on clear browsing data.


You have successfully done if you need more help please leave a comment below your reply will highly appreciate :) thanks.!

Read More

Wednesday, April 30, 2014

// // 5 comments

Create Crest Logo Tutorial in Photoshop


Let’s see, how to create.

You may also see my this article : How to Create Crest Logo Tutorial in Photoshop
[1]-First of all Open New Document of Custom size, Height & Width 500×500 pixels, Resolution 72 & Mode RGB Color.


[2]-Now Open New Layer & then create the following shape with the help of ‘Pen Tool’ & press right click > make selection.


[3]-Now fill the #’dee4f2′ color in selection area.


[4]-Now select the& create the following setting a new layer.


[5]-Now create the selection at new layer & fill with #’36404a’color.

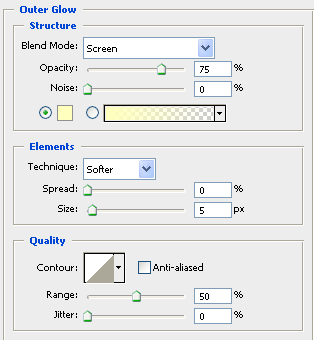
[6]-Now go to Blending Options,& use the following settings
Photoshop Technique-How to use the Blending Options feature.


[7]-Now create the selection at new layer & fill with #’36404a’color.

[8]-Now take the ‘Brush Tool’ create the shading as shown above step [4].
[9]-Now go to Blending Options,select Drop Shadow,Stroke & use the following settings
Photoshop Technique-How to use the Drop Shadow & Stroke feature.


[10]-Now create the selection at new layer & fill with #’36404a’color.

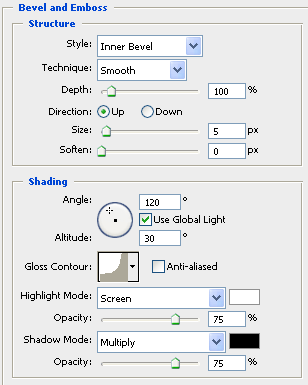
[11]-Now go to Blending Options,select Bevel & Emboss,Contour & use the following settings
Photoshop Technique-How to use the Bevel & Emboss,Contour feature.


[12]-Now your image should look like as shown below.

[13]-Now go to the Blending Option & give the following setting of Drop Shadow.

[14]-Now see below for Final Photoshop Output.I hope this is a good tutorial & U can use these Photoshop Techniques in your Graphics
Design project.
Read More