Thursday, May 15, 2014

// // 1 comment

Windows 9 theme for Windows 8 and Windows 7

You love customize your Windows me to love to make my devices unique and different form others. You can customize your Windows in many ways today i am going to share Windows 9 theme for Windows 8 and Windows 7. You can customize your Windows with many tools Fences, Dexpot but they alone will not change the complete look of your Windows you have to install skin pack for getting whole new and beautiful look.


How to install Windows 9 theme on Windows 8


For getting Windows 9 theme on Windows 8  first of all you have to download skin pack installer. Skin packs installer is easy to install like other windows software. Make sure you have uninstall any old skin pack installer (if any installed) before going further, after installing skin pack installer successfully restart your Windows to see changes.

Download Windows 9 Theme for Windows 8 Online Installer (Recommended)

Download Windows 9 Theme for Windows 8 Offline Installer

How to install Windows 9 theme on Windows 7


For getting Windows 9 look on Windows 7 the procedure is same as of Windows 8 first download Windows 9 skin pack installer. It is very easy to install like other apps in windows 7, after installing restart your Windows 7 to see changes.

Download Windows 9 theme for Windows 7 Online Installer (Recommended)


So, this is easy guide to install Windows 9 theme for Windows 8 and Windows 7, if you face any difficulty while installing feel free to comment below.
Read More

Wednesday, May 14, 2014

// // Leave a Comment

How To Customize Blogger Slideshow Gadget

You know blogger blogs let you to use Blogger Slideshow. But Blogger slideshow gadget does not give the user many options like adjusting the size and style. Google AJAX Feed API provides the full code behind the slideshow gadget and also the opportunity to customize it as you like.

How To Customize Blogger Slideshow Gadget


The Slideshow Gadget Code:

The gadget code loads the slideshow using AJAX Feed API and Javascript. Within the code a location on your page is defined to show the slideshow and style the dimensions. Lastly Javascript is used to create a slideshow control on your page. The full Slideshow code is shown below :

<script src="http://www.google.com/jsapi" type="text/javascript"></script>
<script src="http://www.google.com/uds/solutions/slideshow/gfslideshow.js"
type="text/javascript"></script>
<style type="text/css">
#picasaSlideshow {
width: 250px;
height: 200px;
margin-bottom: 5px;
padding: 5px;
}
</style>
<script type="text/javascript">
google.load("feeds", "1");
function OnLoad() {
var feed = "PUT FEED URL HERE";
var options = {
displayTime:2000,
transistionTime:600,
numResults : 8,
scaleImages:true,
fullControlPanel : true
};
var ss = new GFslideShow(feed, "picasaSlideshow", options);
}
google.setOnLoadCallback(OnLoad);
</script>
<div id="picasaSlideshow" class="gslideshow"><div class="feed-loading">Loading...</div></div>
<a href="http://tonyisright.blogspot.com/">Custom Slideshows.</a>

In the above code replace "PUT FEED URL HERE" with the link of the RSS feed of your pictures album at Flickr/Photobucket/Picasaweb as shown below.

Feeding The Slideshow:


The next step is to provide a stream of pictures to the slideshow. To provide this first create an account at Flickr.com or Photobucket.com or Picasaweb.google.com. Then upload all the photos you want to show to this account.

After uploading pictures you will get the RSS feed from the album created at Flickr :

http://api.flickr.com/services/feeds/photos_public.gne
?id=USERID&lang=en-us&format=rss_200

Replace USER ID with your actual user id at Flickr.com.
RSS Feed from Photobucket.com :

http://feed266.photobucket.com/albums/ii244/USERNAME/feed.rss

Replace 'USERNAME' with your actual username.
RSS Feed from Picasaweb :

http://picasaweb.google.fr/data/feed/base/user/NAME/
albumid/NUMBER
?kind=photo&alt=rss&authkey=KEY&hl=en

Replace NUMBER, KEY and NAME with actual values.

Then copy the full feed url and paste in the code given for the slideshow gadget instead of "PUT FEED URL HERE".

Customizing Slideshow


To customize the slideshow modify the gadget code as shown below :

To Change Number of Images modify this line in gadget code and change the number to what you want :numResults : 8,

To resize images add this line immediately below the numResults line :scaleImages : true,

The images will be resized according to original aspect unless you add this line also : maintainAspectRatio : false,

To change how long images are displayed modify the number in :displayTime : 2000,

To link the images to their source add this line : linkTarget : google.feeds.LINK_TARGET_BLANK,

To show images in medium thumbnail size use this line :thumbnailSize : GFslideShow.THUMBNAILS_MEDIUM,

For small size thumbnail images : thumbnailSize : GFslideShow.THUMBNAILS_SMALL,

Lastly to increase width and height change this code :

#picasaSlideshow {
width: 250px;
height: 200px;
.....
}

Decrease width number to fit in your sidebar width. You can get the width of the sidebar from your blog template code :

#sidebar-wrapper {
width: 220px;
...
}

Installing Slideshow


After modifyng and customizing the slideshow code as shown above :

Login at Blogger.com> Click Layouts link on Dashboard.
Click Add Gadget link on Layouts---> Page Elements.
In Popup window scroll down and click on HTML gadget.
Paste the modified code in Contents window.
Save gadget.
Read More
// // Leave a Comment

Sixteen simple Windows Tips you should Know

Sixteen simple Windows Tips you should Know


1.Switch to welcome screen

Press Win+L to switch to the Welcome screen.

2.Lock your workstation

Press Win+L to lock your workstation.

3.Switch user easly

You can switch users without going through the Welcome screen: From Task Manager, go to the Users tab, right-click a user, and select Connect.

4.Hibrernate computer

Hold down the shift key in the shutdown dialog to change "Stand By" to "Hibernate". Or just press H to hibernate instantly. You can even use the Power Control Panel to configure your power button to hibernate.

5.Disable password when resuming stanby

To disable the password when resuming from standby or hibernation, open the Power Control Panel and uncheck "Prompt for password after returning from standby" on the Advanced tab.

6.Choose details

From the View Menu, select "Choose Details" to select which file properties should be shown in the Explorer window. To sort by a file property, check its name in the "Choose Details" in order to make that property available in the "Arrange Icons by" menu.

7.Display volume control icon in taskbar

To display the volume control icon in the taskbar, go to the Sounds and Audio Devices Control Panel and select "Place volume icon in the taskbar".

8.Delete file without send into recycle bin

Hold down the shift key when deleting a file to delete it immediately instead of placing it in the Recycle Bin. Files deleted in this way cannot be restored.

9.Customize 'send to' menu

Put a shortcut to your favorite editor in your Send To folder and it will appear in your "Send To" menu. You can then right-click any file and send it to your editor.

10.Organize favorites

a) To organize your Favorites in Explorer instead of using the Organize Favorites dialog, hold the shift key while selecting "Organize Favorites" from the Favorites menu of an Explorer window.

b) You can organize your Favorites by dragging the items around your Favorites menu.
Alternatively, you can open the Favorites pane and hold the Alt key while pressing the up and down arrows to change the order of your Favorites.

11.View IE in fullscreen

To run Internet Explorer fullscreen, press F11. Do it again to return to normal mode.

12.Hide printers & faxes

If your "Printers and Faxes" folder is empty, you can hide the "Printers and Faxes" icon when viewed from other computers by stopping the Print Spooler service.

13.Add/remove columns from detail mode

To add or remove columns from Details mode, select Choose Details from the View menu, or just right-click the column header bar.

14.Go backwards or forward by mouse wheel

In Internet Explorer, hold the Shift key while turning the mouse wheel to go forwards or backwards.

15.Add current page to favorites

In Internet Explorer, type Ctrl+D to add the current page to your Favorites.
This and many more keyboard shortcuts can be found by going to Internet Explorer, clicking the Help menu, then selecting Contents and Index. From the table of contents, open Accessibility and click "Using Internet Explorer keyboard shortcuts".

16.Shut down via Remote Desktop

To shut down via Remote Desktop, click the Start button, then type Alt+F4.
Read More
// // Leave a Comment

How to add Blogger Share Buttons to Custom Blogger Templates

Blogger has released their new Share Buttons feature through which makes we can now easier bookmark, tweet, fshare, email ,etc your post of a website. It is associated with the blogger templates (given templates). But, if you're using any custom blogger template, you may not see the widget appearing in blog even though you activate it. In this fact you have to customize your blog a little. Follow the instructions below.

How to add Blogger Share Buttons to Custom Blogger Templates?

Note: before making any changes..first backup your template

Step: 1  Sign into Blogger > Design > Edit HTML

2. Add this line anywhere you want the widget to appear.

<b:include data='post' name='shareButtons'/>
Normally, in most templates, you can add it after this line..

<data:post.body/>
and add this code after that line..

<p><data:post.body/></p>
<div style='clear:both; padding: 10px 10px 10px 10px;'> <b:include data='post' name='shareButtons'/> </div> 
Note: If you're using Magazine style blogger template, You can find the data:post.body line TWO TIMES.. So, try in both ways and find out which one is working..and remove the other one.

Be aware: If you still don't see it in your Blog, Make sure..you activated it by going to
Blogger Dashboard > Design > Click the 'edit' button of the Blog post section.

add Blogger Share Buttons to Custom Blogger Templates

You have done if you need more info please hit a comment below thanks for reading this article.

Read More

Tuesday, May 13, 2014

// // Leave a Comment

How To Make Blogger Template Mobile Friendly

As you know, millions of people use their mobile phones to access internet. The mobile internet speed is also very fast these days with 3G's , mobile apps,etc.

From this, we can say many of your readers are coming to your blog through mobile phones..But, if you don't make your blog mobile friendly, .you may lose all your mobile readers because in a mobile phone, a normal blog takes lot of time to load and there are other issues that your site not fitting properly in the mobile screen.


So, here is how to make your Blogger (blogspot) blog mobile internet friendly..

Sign into your Blogger account > Design > Edit html

Find this line..

<b:include data='blog' name='all-head-content'/>

Paste this code below that line...

<meta content='IE=EmulateIE7' http-equiv='X-UA-Compatible'/>
<b:if cond='data:blog.isMobile'>
<meta content='width=device-width, initial-scale=1.0, user-scalable=0' name='viewport'/>
<b:else/>
<meta content='width=1100' name='viewport'/>
</b:if> 
Save the Changes!

Now you have successfully make your blog template smart phone and other mobiles friendly.

Read More

Monday, May 12, 2014

// // 1 comment

9 Alternative Ways To Access Blocked Sites

Is you school, college or office blocking you from getting on social network sites like Friendster,Facebook, Myspace, Bebo, Hi5, Orkut, etc? Here’s few ways you can bypass the restrictions and surf like normal, but please check with your local authorities before using them. We will not held any responsibility if you’ve breach the regulations of any.

Full list after jump.

Using IP Instead Of URL

This depends on the software/application used. Sometimes blocked sites are stored as a list of URLs (eg. www.yahoo.com, www.donwload.com,etc) and typing the IP instead of the URL might sometimes work. In a local computer, doing a ping www.whatsmyip.org
omain.com command in Command Prompt (Mac users use Terminal) will return you the IP address. You can also do it online via

Redirection With Short URL Service

Sometimes the URL you intend to browse might be ban, but converting them to another a shorter URL with short URL services might just help you to bypass the settings.

Google Cache

Search engines like Google and Yahoo cache webpages and these cached pages are stored in search engines themselves, which likely will be added to the blocked list. Click on the ‘cache’ will bring you to a cache version of the page, as updated as how Google caches it.

Google Cache

Internet Archive – Wayback Machine

Wayback Machine is a internet service that periodically keeps a copy of almost all websites in the Internet way from the date they’re started. Clicking on the latest copy of what Wayback Machine have should be somewhat similar to the real site. Another way to access blocked sites via caches.

Wayback Machine

Use Proxy In Browsers

There are tons of sites out there that distributes free proxies of almost any country. Here’s an example. Check out the following methods on how/where to insert proxies in your web browsers.

Proxy Surfing – Firefox

Proxy Surfing – Firefox


Under Advanced tab, select Network tab, then click inside Connection Settings. Select Manual proxy configuration, put proxy under HTTP proxy.

Proxy Surfing – Internet Explorer


Go to Tools -> Internet Options. Select Connections tab. Click into LAN Settings, check Proxy Server. Insert your proxy URL inside Address.

Bypass With Translations Services

Online translation services like AltaVista BabelFish, Google Translate allows you to translate a website from one language to another and display the translated results on their own page.The trick here is to enter the URL (website you’re blocked), retranslate it even if you don’t need to and let Google or AltaVista fetch you the content.

Subscribe To RSS Feed

This might not work for all sites, but if the site you intended to visit provides RSS feeds, you can subscribe and read it with a RSS reader, or have it regularly send the contents to your email

Retrieve Web Pages Via Email

Web2Mail is a free service that sends websites you want to read right into your inbox. All you need to do is send an email to www@web2mail.com with the URL as subject title.
Read More

Monday, May 5, 2014

// // Leave a Comment

Top 5 Android Camera Apps

There are plenty of Apps in the Google play some great apps as well as Junk apps. Sometimes it is difficult to choose Apps but as I already have Listed Top Android Apps. So today i am going to share Top 5 Hand picked Android camera Apps.

1.Cymera


I personally use this and love it. It has handpicked picked filters and borders. Amazing Beautifying effects like Big eyes, Smile, Slim face and 800+ stickers, comics, emotions and much more. It is available free in Play store.

Download Cymera

2. HDR Camera+


13.5 million photos are taken every year with HDR camera. It supports full resolution , take HDR snaps with just one tap. like many other apps it also two version one is paid and second is free. Get It on GooglePlay

Do not worry about the Paid Apps as I have already listed check Download Paid Android apps free of cost.

3. Camera FV-5


Camera FV5 is Professional application for your mobile,  that’s put DSLR like Control on your Android phone. You can adjust exposure compensation, ISO, light metering mode, focus mode, white balance and program mode. The only limit is your imagination and creativity.


4. Snap Camera HDR


Snap camera is based upon Android 4.4 user interface having 4.5 stars in Google play. Its size and varies with different devices. Like many other Apps it has two version paid and free. Before buying this you Check trail version.


5.Camera ZoOm FX


It is one of the powerful and fastest camera in the Google Play it can take 20 shots per second. You can also “win 100$ in Instagram style photo contest”. Like other camera apps it also has two versions. You can download trail version by following link but if you want to download paid one for free How to download paid Android Apps free of Cost.

Read More
// // 1 comment

How To Download Paid Android Apps Free

Android is one of the best Operating system these days for this reason there is plenty of apps in Play store. There is two type of apps in Play store one is free and another one is Paid. You can download free apps easily Top 10 Android apps  but you cannot spent too much money on buying apps only. Everyone in this world love freebies including me you too reading this because you want to download paid Android apps free, wondering how ? Is is very easy just follow the steps.

How To Download Paid Android Apps Free


There are three methods to download paid android apps free.

1. APPDROID


The first and easy method to download paid Android apps free, Just download and Install the Appdroid on your Android phone and start searching for the required app in appdroid. after finding your required download the app without spending a single penny. download your favorite apps instantly. do not waste time just download the app by download link below. Download Appdroid


Note: It supports only Android 4.x and above check your Android version before downloading. if u have not supporting Android version try other method given below.

2. GOOGLE SEARCH


Yes you can download paid Android apps via Google search. just follow the steps below. 1. Go to Google play and search the app you want to download. 2. Go to description and check that app version.


3. After checking the version go to Google.com and search the app with its version and specially keep in mind add .apk after version. here Apk means Setup of any Android application. for example : suppose you want to download My backup pro 4.0.5  search Google with “My backup pro 4.0.5 .apk”


4. Go to given search results and found and Download the apk file and go to file manager and open the file that you have downloaded, it will ask you for allowing unknown source, tap on setting and tick the unknown source. 5. Install the app and start using it, this second to download paid android apps free
Read More
// // Leave a Comment

Create Polaroid In Simple Steps With PhotoNotes

PhotoNotes is yet another free service that helps creating Polaroid photos online easy. The way the website breaks down the steps simply make creation of Polaroid a no-brainer.


Here’s all you need to do:


  1. Upload a photo
  2. Select a frame
  3. Select a font
  4. Select font color
  5. Type your message, and click preview


If you really like what you’ve created, consider sharing it with them with your friends – viaPhotoNotes too. Here’s another 2 ways to create Polaroid photos I’ve previously mentioned about:


  • Create Polaroid Online With Instantizer [Web]
  • Create a Polaroid Effect of your Photo [Photoshop]


Thanks dg. Photo courtesy of AprilCherrie
Read More
// // Leave a Comment

How To Clear All Traces Of Your Internet Activity

[Windows only] Everyday we perform hundreds of activities on Internet and each activity actually has been recorded down in a form of cookies, logs or temporary internet files. Some of these files are useful, but some actually do harm. It would be safe to clean out unwanted traces of your online journeys and keep you Internet privacy after accessing some security website, for example, online banking website.


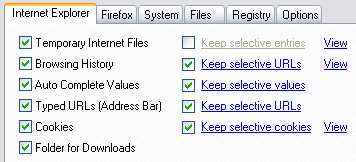
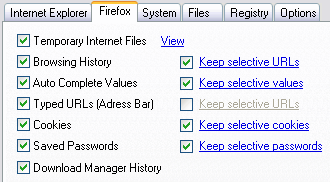
IE Privacy Keeper takes the burden of sweeping up the crumbs by making sure no one will know the web sites you’ve visited, or the search queries you’ve made.
Regardless you are using Internet Explorer or Mozilla Firefox, IE Privacy Keeper automatically cleans up the browser history once you are done surfing the net. The program will correctly clean up all index.dat files without the need for a Windows restart.


You can specify custom files and registry keys to delete. IE Privacy Keeper has secure deletion feature to prevent data recovery and conceal the cleanup.

You can keep selective items in the browsing history and hide the program form the list of running applications. Secure deletion will make any attempts to recover deleted items fail.


Here are some key features of “IE Privacy Keeper”:


  • Cleans up Internet Explorer and Mozilla Firefox history
  • Cleans up index.dat files without the need for a Windows restart
  • Keep selected items
  • Cleans up your offline activity traces
  • Cleans up custom folders and registry keys
  • Automatically cleans up when IE or Firefox exits
  • Various notification methods
  • Secure deletion

Did I say that IE Privacy Keeper is absolutely free?

Read More

Saturday, May 3, 2014

// // Leave a Comment

10 Tips To Conserve Your Smartphone Battery

Apple, BlackBerry, Samsung and other global brands have come up with smartphones equipped with powerful mobile operating systems such as Google’s Android, Nokia’s Symbian, Apple’s iOS, etc, that allows users to play games, listen to mp3s, snap pictures, have access to the Net and even stream videos.

Given their diverse range of capabilities and multi-functionality running on a mobile (as in on-the-go) platform, it’s no wonder that battery life has always been a concern for developers, manufacturers and the users themselves. On average, most smartphone batteries last between one and two days before being completely depleted, and in need of a recharge.


(Image Source: Dokisoft)

While we wait for the hardware development to catch up, the alternative will be to conserve battery life. As it is with our energy levels, battery life can be effectively utilized and managed, leaving nothing to go to waste. Without a battery charger or a spare battery with you everywhere you go, you’ll have to make due with minimizing the consumption of battery juice.

1. Turn Off Vibrations

Vibrations are great for notifying you about incoming calls or messages when you’re in the theatre, meetings or other places where it’s necessary to keep the phone silent. In places where it doesn’t matter, it will be better for you to use your ringtone as notification if you want to keep your smartphones on longer.
Vibrations actually use up more power than ringtones. The sounds produced by ringtones are just very tiny vibrations in your smartphone’s speaker. Compare that to the shaking of the entire phone via vibrating a smart weight, playing a ringtone definitely zaps less of your battery. The same applies for using vibration for tactile feedback. If you don’t think it’s necessary, then disable vibrations or at the very least, lessen the magnitude of the vibrations.

2. Dim Your Screen

This one tip affects battery life drastically. It’s obvious that dimming your screen will reduce your smartphone’s power consumption since we all have to activate the screen whenever we use our phones. If our screen is brightly lit up every couple of minutes when we check our emails and such, it eventually will zap battery juice. Auto-brightness setting enable the smartphone to adjust the brightness to its optimal level for reading while conserving battery life.

On the other hand though, you may consider tuning the level permanently to the dimmest level that you can still read under without straining your eyes. Doing so may do wonders to your battery life in the long run.

3. Shorten Screen Timeout

In the same manner, if you wish to minimize the power consumption of your smartphone of the screen display, you ought to consider shortening the screen timeout. This decides how long the screen will remain lit after you finish interacting with it.
Some of us do not have the habit of ‘locking’ the phone after we we are done with it; we just let it go lights out by itself. Keeping the timeout duration short will ensure that the phone doesn’t waste power when you’re not using it.

4. Switching Off When Inactive

Although it is true that turning on your phone consumes more power than unlocking your phone,switching it off for a couple of hours can save more battery than leaving it on sleep or inactive mode. If you know you’re not going to touch your phone for an extended period of time, such as when you’re attending a meeting or sleeping, you can actually cut down a significant amount of energy consumption if you simply switch it off.


You might be wondering why you should even bother about battery level when you’ve a charger with you at home while you sleep. Well, the thing is that repeated charging for certain kind of batteries eats up the battery volume. For such batteries, the best way is to conserve as much as you can so that your battery retains its original capacity as much as possible.

5. Charge Your Battery Correctly

Speaking of phone charging, there are generally two kinds of rechargeable batteries commonly used for smartphones: Lithium-ion (Li-Ion), and Nickel-based batteries: namely Nickel-Metal Hydride (NiMH) and Nickel-Cadmium (NiCd).
The battery capacity in NiCd batteries are reduced every time you recharge them. Nonetheless, NiCd batteries have longer life cycles i.e. they can be recharged more often than NiMH batteries before stop working. Nickel-based batteries should be charged (to the full amount) when they’re more or less out of power, and not when there’s still a good amount of energy left.


(Image Source: Slairea)

Li-Ion batteries have the longest life cycle among the three types of batteries but they also need to be charged more frequently (even when the battery is not fully used up) to maintain its original capacity. To keep your battery lasting longer, find out more about the type of battery that your smartphone uses and maintain the appropriate charging strategy for optimum usage.

6. Close Unnecessary Apps

Some of us open app after app and don’t bother to close them even after we no longer need to use them. This multi-tasking capability is a common feature of smartphones, but it is also a main reason why battery life gets drained away easily. The worst thing is that you’re losing battery juice when you are not even using them. Leaving them open will leave your battery at half-bar in no time.
As often as possible, kill your apps if you are not using them. There are some valuable apps out there that manage the multitasking ability of your smartphone to ensure it performs at its best to conserve battery life without jeopardizing usage. One such Android app is the Advanced Task Killer.

7. Disable GPS

Certain apps eat up more battery juice than others, particularly apps which utilize the GPS system to track your location. Your smartphone has a GPS unit that allows the sending and receiving of signals to and from satellites to determine your exact location, which is integral for some apps to work, for example, map-based apps like Google Maps or to check-in on Facebook.

(Image Source: Fotolia)
When left running in the background, some of these apps may continue to send and receive signals. It takes a lot out of your battery to continuously do that, even if you aren’t aware of it. Hence, you should ensure that those particular apps are closed when you really don’t need them. A more extreme way is to disable location services when prompted by these apps. It may slow down the efficiency of these apps but you won’t be tracked on your location and some users deliberately do that for privacy reasons.

8. No Bluetooth, Wi-Fi, 3G/4G When Not In Use

Energy is consumed whenever your smartphone searches for signals, Wi-Fi, 3G or Bluetooth etc. When the reception is poor, the phone will continue scanning to attain a good connection.Repeated searches for these signals can easily make your battery level drop a notch.
What I’m saying is that you should turn off your Wi-Fi or Bluetooth when you don’t need to be connected. One convenient way to do it is to switch to ‘Airplane Mode’ or just switch your phone off when you know you can’t get any signal.
On the other hand, when you need good reception for your smartphone, place or position your phone in high connectivity zones. This will prevent your smartphones from constantly seeking for a connection and wasting your precious battery power switching from one signal to the other.

9. Minimize Notifications

With constant connectivity to the Internet, we tend to get notifications on our smartphones all the time, be it updates on the latest news, emails, high scores from games, add-ons for apps etc. But I’m sure that you would only want to be notified on the more essential stuffs like new text messages, or messages from Whatsapp.

(Image Source: Taakoses)
Not only is it annoying to constantly receive irrelevant notifications that can actually wait, it is also a power sucker for each of these notifications. Every incoming notification will light up your screen, make a sound alert or vibrate.
Manage your settings well and disable unnecessary notifications to save a little battery power (and avoid being frustrated with these constant notifications).

10. Maintain Cool Temperature

Some of us might have observed that our battery runs out faster when our smartphones are warm. Put simply, don’t leave your smartphones under direct sunlight or in any place that is hot.
One of the more common occurrences would be leaving the smartphone in a car parked under the sun. The battery will function optimally in cooler environments, so do look out for, and try to avoid, scenarios where your phone is exposed to unnecessary and excessive heat.
Read More
// // Leave a Comment

100 Keyboard Shortcuts (Windows)

Getting familiar with keyboard shortcuts not only help you get the work done faster, but also more efficient. If your daily job rely heavily on using Windows, here are some 100+ Windows Keyboard Shortcuts you might want to check out. If there’s any nifty shortcuts we have missed, appreciate a heads up.

The General Shortcuts

We’ll kickoff the list with some really general shortcuts that you often used.

  • CTRL+C (Copy)
  • CTRL+X (Cut)
  • CTRL+V (Paste)
  • CTRL+Z (Undo)
  • Delete (Delete)
  • Shift+Delete (Delete the selected item permanently without placing the item in the Recycle Bin)
  • CTRL while dragging an item (Copy the selected item)
  • CTRL+Shift while dragging an item (Create a shortcut to the selected item)
  • F2 key (Rename the selected item)
  • CTRL+RIGHT ARROW (Move the insertion point to the beginning of the next word)
  • CTRL+LEFT ARROW (Move the insertion point to the beginning of the previous word)
  • CTRL+DOWN ARROW (Move the insertion point to the beginning of the next paragraph)
  • CTRL+UP ARROW (Move the insertion point to the beginning of the previous paragraph)
  • CTRL+Shift with any of the arrow keys (Highlight a block of text)
  • Shift with any of the arrow keys (Select more than one item in a window or on the desktop, or select text in a document)
  • CTRL+A (Select all)
  • F3 key (Search for a file or a folder)
  • Alt+Enter (View the properties for the selected item)
  • Alt+F4 (Close the active item, or quit the active program)
  • Alt+Enter (Display the properties of the selected object)
  • Alt+Spacebar (Open the shortcut menu for the active window)
  • CTRL+F4 (Close the active document in programs that enable you to have multiple documents open simultaneously)
  • Alt+Tab (Switch between the open items)
  • Alt+ESC (Cycle through items in the order that they had been opened)
  • F6 key (Cycle through the screen elements in a window or on the desktop)
  • F4 key (Display the Address bar list in My Computer or Windows Explorer)
  • Shift+F10 (Display the shortcut menu for the selected item)
  • Alt+Spacebar (Display the System menu for the active window)
  • CTRL+ESC (Display the Start menu)
  • Alt+Underlined letter in a menu name (Display the corresponding menu)
  • Underlined letter in a command name on an open menu (Perform the corresponding command)
  • F10 key (Activate the menu bar in the active program)
  • RIGHT ARROW (Open the next menu to the right, or open a submenu)
  • LEFT ARROW (Open the next menu to the left, or close a submenu)
  • F5 key (Update the active window)
  • Backspace (View the folder one level up in My Computer or Windows Explorer)
  • ESC (Cancel the current task)
  • Shift when you insert a CD-ROM into the CD-ROM drive (Prevent the CD-ROM from automatically playing)

Dialog Box Keyboard Shortcuts

  • CTRL+Tab (Move forward through the tabs)
  • CTRL+Shift+Tab (Move backward through the tabs)
  • Tab (Move forward through the options)
  • Shift+Tab (Move backward through the options)
  • Alt+Underlined letter (Perform the corresponding command or select the corresponding option)
  • Enter (Perform the command for the active option or button)
  • Spacebar (Select or clear the check box if the active option is a check box)
  • Arrow keys (Select a button if the active option is a group of option buttons)
  • F1 key (Display Help)
  • F4 key (Display the items in the active list)
  • Backspace (Open a folder one level up if a folder is selected in the Save As or Open dialog box)

Microsoft Natural Keyboard Shortcuts


  • Win (Display or hide the Start menu)
  • Win+BREAK (Display the System Properties dialog box)
  • Win+D (Display the desktop)
  • Win+M (Minimize all of the windows)
  • Win+Shift+M (Restore the minimized windows)
  • Win+E (Open My Computer)
  • Win+F (Search for a file or a folder)
  • CTRL+Win+F (Search for computers)
  • Win+F1 (Display Windows Help)
  • Win+ L (Lock the keyboard)
  • Win+R (Open the Run dialog box)
  • Win+U (Open Utility Manager)

Accessibility Keyboard Shortcuts

  • Right Shift for eight seconds (Switch FilterKeys either on or off)
  • Left Alt+left Shift+PRINT SCREEN (Switch High Contrast either on or off)
  • Left Alt+left Shift+NUM LOCK (Switch the MouseKeys either on or off)
  • Shift five times (Switch the StickyKeys either on or off)
  • NUM LOCK for five seconds (Switch the ToggleKeys either on or off)
  • Win +U (Open Utility Manager)

Windows Explorer Keyboard Shortcuts

  • END (Display the bottom of the active window)
  • HOME (Display the top of the active window)
  • NUM LOCK+* (Display all of the subfolders that are under the selected folder)
  • NUM LOCK++ (Display the contents of the selected folder)
  • NUM LOCK+- (Collapse the selected folder)
  • LEFT ARROW (Collapse the current selection if it is expanded, or select the parent folder)
  • RIGHT ARROW (Display the current selection if it is collapsed, or select the first subfolder)

Shortcut Keys For Character Map

  • After you double-click a character on the grid of characters, you can move through the grid by using the keyboard shortcuts:
  • RIGHT ARROW (Move to the right or to the beginning of the next line)
  • LEFT ARROW (Move to the left or to the end of the previous line)
  • UP ARROW (Move up one row)
  • DOWN ARROW (Move down one row)
  • PAGE UP (Move up one screen at a time)
  • PAGE DOWN (Move down one screen at a time)
  • HOME (Move to the beginning of the line)
  • END (Move to the end of the line)
  • CTRL+HOME (Move to the first character)
  • CTRL+END (Move to the last character)
  • Spacebar (Switch between Enlarged and Nor mal mode when a character is selected)

Microsoft Management Console (MMC) Main Window Keyboard Shortcuts

  • CTRL+O (Open a saved console)
  • CTRL+N (Open a new console)
  • CTRL+S (Save the open console)
  • CTRL+M (Add or remove a console item)
  • CTRL+W (Close window/tab)
  • F5 key (Update the content of all console windows)
  • Alt+Spacebar (Display the MMC window menu)
  • Alt+F4 (Close the console)
  • Alt+A (Display the Action menu)
  • Alt+V (Display the View menu)
  • Alt+F (Display the File menu)
  • Alt+O (Display the Favorites menu)

MMC Console Window Keyboard Shortcuts


  • CTRL+P (Print the current page or active pane)
  • Alt+- (Display the window menu for the active console window)
  • Shift+F10 (Display the Action shortcut menu for the selected item)
  • F1 key (Open the Help topic, if any, for the selected item)
  • F5 key (Update the content of all console windows)
  • CTRL+F10 (Maximize the active console window)
  • CTRL+F5 (Restore the active console window)
  • Alt+Enter (Display the Properties dialog box, if any, for the selected item)
  • F2 key (Rename the selected item)
  • CTRL+F4 (Close the active console window. When a console has only one console window, this shortcut closes the console)

Remote Desktop Connection Navigation

  • CTRL+Alt+END (Open the m*cro$oft Windows NT Security dialog box)
  • Alt+PAGE UP (Switch between programs from left to right)
  • Alt+PAGE DOWN (Switch between programs from right to left)
  • Alt+INSERT (Cycle through the programs in most recently used order)
  • Alt+HOME (Display the Start menu)
  • CTRL+Alt+BREAK (Switch the client computer between a window and a full screen)
  • Alt+Delete (Display the Windows menu)
  • CTRL+Alt+- (Place a snapshot of the active window in the client on the Terminal server clipboard and provide the same functionality as pressing PRINT SCREEN on a local computer.)
  • CTRL+Alt++ (Place a snapshot of the entire client window area on the Terminal server clipboard and provide the same functionality as pressing Alt+PRINT SCREEN on a local computer.)

Internet Explorer Navigation

  • CTRL+B (Open the Organize Favorites dialog box)
  • CTRL+E (Open the Search bar)
  • CTRL+F (Start the Find utility)
  • CTRL+H (Open the History bar)
  • CTRL+I (Open the Favorites bar)
  • CTRL+L (Open the Open dialog box)
  • CTRL+N (Start another instance of the browser with the same Web address)
  • CTRL+O (Open the Open dialog box, the same as CTRL+L)
  • CTRL+P (Open the Print dialog box)
  • CTRL+R (Update the current Web page)
  • CTRL+W (Close the current window)
Read More