Showing posts with label Facebook. Show all posts

Saturday, April 26, 2014

// // 2 comments

How To Add Facebook Like and Share Button in Every Posts

Adding a facebook like and facebook share button in each and every posts of blogger blogspot has become a common task of the professional blogger. In this post i am going to tell you “How to add facebook like and share button in all posts of blogger blog?”. If you add the like and share button below the blogger posts then the visitor of your blog will able to know the popularity of your post and will be more effective to read your posts and stay your site for long time. So your bounce rate will be decreased and your traffic will be increased. You may think that the coding knowledge such like HTML, CSS, JavaScript will be needed to add facebook like and facebook share button with the blogger posts. If you are more serious about that then the declaration for you that you

do not need the coding knowledge to add the buttons to your blogger blog. Just follow the tricks provided below and win to add facebook like and share button into every posts of your blogger blog. :)


Let's See The Simple Trick

Step 1 Html Tag

  • Go to Blogger.com
  • Choose your Blog where you want to add Facebook Like & Share Button
  • Click on Template on Left Side Menu
  • Now Click Edit Html
  • You will see the HTML tags in the beginning of the template coding Like this

<?xml version="1.0" encoding="UTF-8" ?>
<!DOCTYPE html>
<html b:version='2' class='v2' expr:dir='data:blog.languageDirection' xmlns='http://www.w3.org/1999/xhtml' xmlns:b='http://www.google.com/2005/gml/b' xmlns:data='http://www.google.com/2005/gml/data' xmlns:expr='http://www.google.com/2005/gml/expr'>

  • Now add the below code at the end of the <html> tag. As shown in the image

 xmlns:fb='http://ogp.me/ns/fb#'

Step 02: Editing Body Tag

Now find out the <body> tag [Click anywhere in the code box then press Ctrl+F]. Now type <body in the box and press “Enter” then you will get the <body> tag
Now add the below code just under the <body> tag. As shown in the picture.

<div id="fb-root"></div>
<script>(function(d, s, id) {
  var js, fjs = d.getElementsByTagName(s)[0];
  if (d.getElementById(id)) return;
  js = d.createElement(s); js.id = id;
  js.src = "//connect.facebook.net/en_US/all.js#xfbml=1";
  fjs.parentNode.insertBefore(js, fjs);
}(document, 'script', 'facebook-jssdk'));</script>

Now find out the <div class='post-footer'> tag [Click anywhere in the code box then press Ctrl+F. A Now write the code <div class='post-footer'> in the box and press “Enter” then you will get the <div class='post-footer'> tag ]
Now add the below code just after <div class='post-footer'> As shown in the picture


<div class="fb-like" expr:data-href='data:post.canonicalUrl' data-send="true" data-width="450" data-show-faces="true"></div>

Now Click on “Save template”

You have done if you need more help please let me know i will help you.
Read More

Wednesday, January 15, 2014

// // Leave a Comment

How To Add Facebook Follow Button In Blogger

Generally, widgets have a lot importance in Blogging. Usually they attract the visitors and also help them in following your blog. So, today we will tell you How To Add Facebook Follow Button In Blogger. Its a very good widget and will provide you excellent productive results, because with this widget people can easily follow you on Facebook and so, like this they can be in close touch with you and your blog. But, note that its only for a single author so if you have more than one authors on your blog than you have to chose, whose ID should be given for following.

So, if you are a single author of your blog, you can directly and easily get the follow button from Facebook widget page and paste it in your blog anywhere, you want it to be displayed.

Auto SEO Script for Blogspot Blogs

Apply on Google AdSense in urdu

Steps For Adding Facebook Follow Button In Blogger


Believe me, its very easy. First you have to go to Facebook Social Plugins Website Page. Now, enter the URL of your Facebook profile there to generating the code of that widget. There are alot of options for customization which will help to create a perfect match for your blog/website.


After placing your Facebook profile's URL there, you can clearly see how your widget will appear on your blog/website. Now, customize it as you want and click Get Code.
Get Code

Now, a new window will pop-out, select the iFrame tab and copy the code. 
Popup


Go to Blogger Dashboard >> Layout >> Add a gadget >> HTML/JavaScript.
Paste that code which you copied in the above steps in the given pop-up tab and click Save.
Congratulations ! You have done it.

Final Words 


If you enjoy this article please share this with your friends and stay tuned more interesting articles ae waiting for you if you need any help please feel free to contact us or leave a comment below will reply will be highly appreciate thanks.


Read More

Friday, January 3, 2014

// // Leave a Comment

Official Facebook App for Windows 8 is now available

Good News for Windows 8 users.. A few days back Microsoft's Latest operating system Windows 8.1 Update was available for all windows users.. The Good News is that One of the Most Popular social networking site " Facebook " has released their Facebook App for Windows 8 Users..


Yes, Official Facebook App for Windows 8 users is now available on Windows store for download also it's for free !! Just go to Windows store by using your store app on windows 8 or you can get there directly from the given link below..

Screenshots of

News Feed 


Timeline


Download

You can download it from Microsoft's Official Website : Download Facebook App for Windows
Read More

Sunday, November 10, 2013

// // Leave a Comment

Best way of Getting Quality Traffic From Facebook


Best way of Getting Quality Traffic From Facebook

Best way of Getting Quality Traffic From Facebook. Facebook is a networking monster which has finished wonders to search engine optimization. The best part about Facebook is that apart from keeping you close to your associates, it is furthermore utilised as a enterprise percentage. A newer tendency has seen diverse online sellers promoting their websites through this platform with special pages devoted to their products. 

In detail, the traffic which one gets from seo is anticipated to be surpassed by the communal networking sites like twitter and Facebook. But then, not everyone is equipped to reap the benefits suggested by it. One desires to expert the tactics which is a certain shot way of getting you quality traffic from Facebook which offers a plethora of possibilities needed to be explored. 

Our first step towards being a networking pro starts with making an interesting profile. This profile is the face of your company and has to be catchy to draw the users towards it. Remember to make it public to get more visitors. If you can write your own Facebook extension, nothing can be better. It is advisable to include your site information right on your wall and picture gallery. Building a network can build interest around your products. You can invite friends and acquaintances to join you without being too pushy and indulging in spamming.

Regularity is a major aspect of networking; hence, you need to publish newer content from time to time. An active profile is all that takes to get more people to your site. This also involves visiting the profiles of your supporters and commenting on their posts. After all, Facebooking is a full-time job and brings the best dividends in return.

Putting RSS feeds along with the blog links also brings a lot of traffic to you. With numerous Facebook apps released from time to time, you can surely find one or the other working for you. Then there is Facebook social ads or PPC ads which enable you to start a campaign.

Smart users usually start a group to get a free niche for their product. Once it is started, you can ask people to join it which bring you closer to your target segment. The result you get is a set of users who are genuinely interested in your product or ideas.

At the end of the day, along with all the benefits, Facebook also brings some concerns; one among them is exposure to your personal information to anyone and everyone. So remember, if you have privacy concerns, you better make two profiles, one public and the other personal.

With regular changes and updating it is difficult to set norms for Facebook. You just need to continue your exploration and find newer tactics which will work to bring traffic to your website. After all, success awaits you at the foothills of this networking boss.

Read More
// // Leave a Comment

5 Simple Step To Add Your Blog To Your Facebook Profile Page

Social media si a great source of blog promoting online.This brings a lot of traffic to your blog by attracting potential visitors.


5 Simple Step To Add Your Blog To Your Facebook Page

In this connection we are going to tell you 5 simple steps to add your blog to your Faacebook profile page. It is the best way to promote your blog because, when you add your blog to your profile, a snippet of your latest post automatically appears on your profile’s home page. Actually it is your profile’s status update which helps you in your blog promotion efforts. Your followers, when connected with you, will automatically see that snippet. It will appear on their Facebook status updates page and they are likely to click on it. This will direct them to your blog to read your post.

See Related Articles.


Following are few easy steps to add your blog to your Facebook profile.

  1. Go to your Facebook Profile page and select the "Settings" tab under the "What are you doing now?" in status update box.
  2. Under "Stories Posted by You", there is an interface, "You can automatically import activity from YouTube, Flickr and other services to your profile." You should select the "other services" link.
  3. Select "Blog/RSS" on the extreme right side of the page.
  4. Enter the complete “URL” for your blog.
  5. Now your blog feed will be automatically introduced to your Facebook status updates.
Next time when you will publish a post on your blog, you will see that post appears as a snippet on your Facebook profile page as a status update. If your Facebook profile is public, anyone on the internet can see it.


So you see how easy it is to broaden your efforts to promote your blog by spreading the word about your blog using your Facebook profile. It is so easy that it will just take 2 minutes to do all that.

If you need more help you please feel free to our contact us page or please leave your comment below we'll appreciate you advise and comments.

Read More
// // Leave a Comment

Adding a Facebook Popup Like Box In Blogger

After my previous articles about How to add Facebook Slide Box for Blogger. Today i share how to add a Facebook popup like box in blogger in simple way

Adding a Facebook Popup Like Box In Blogger  | tonyisright.blogspot.com

How to Add It to Your Blog? 

Well, it’s very simple. The complete code to add it to your blog is shared as under. Just follow the following easy steps in order to install it on your blog.

1. Go to blogger Layout page

2. Add a Gadget >> Select HTML/JavaScript gadget 

3. Paste below code inside that HTML/JavaScript gadget

Read More

Monday, October 14, 2013

// // Leave a Comment

Lovely Facebook Like Box Without Border

Lovely Facebook Like Box Without Border
Adding a facebook like box into your blogger blog or website is a good practice to help your visitors to like your facebook fan page. Facebook developers really did a great job by creating that nifty like box which have a grey border around that. Mostly bloggers feel that, the border is looking nasty for their blog template and they need to remove it. I have read many articles on this topic and find that almost every site owner is giving a long css code and tell you to wrap like box code into a div tag to hide that border. Friends, you can remove that border easily. There is no need to add that code into your blog template. After removing the border, the like box will look more professional and stylish. Let see how to do it.

Remove Border From Facebook Like Box

If you know how to add facebook like box to blogger blog, then you will be aware with the default code of the like box which looks like this:

<iframe src="//www.facebook.com/plugins/likebox.php?href=http://www.facebook.com/infoblogmaz&amp;width=292&amp;height=258&
amp;colorscheme=light&amp;show_faces=true&amp;border_color&amp;stream=false&amp;header=false&amp;" style="border:none; overflow:hidden; width:292px; height:258px;" ></iframe>

This little code is used to add a like box into your blog but we can't remove the border from that like box with this code. To do this job, we have to make some changes in this code. Don't worry, you have no need to do anything. I have done all the job for you. You just need to replace your like box code with the code given below.

<iframe src="//www.facebook.com/plugins/likebox.php?href=http://www.facebook.com/infoblogmaz&amp;width=300&amp;height=258&amp;show_faces=true&amp;colorscheme=light&amp;stream=false&amp;border_color=%23fff&amp;header=false" scrolling="no" frameborder="0" style="border:none; overflow:hidden; width:300px; height:258px;" allowtransparency="true"></iframe>

Once you replace the code, visit your blogger blog or website and see the changes. Border around your facebook like box will not see again. It will look more professional and stylish as shown in the image given below.

sample Lovely Facebook Like Box Without Border

If you like my post please share it. !


Read More

Tuesday, October 8, 2013

// // Leave a Comment

Add Facebook like button in every Blogger Post

Let your visitors like your content by adding Facebook Like Button to your post content. In this article I will teach you step by step on how to add Facebook Like Button below blogger blog post title with different button styles that suit to your content for example we have a standard, with box count, and with button count. We all know the importance of traffic for Rankings.
 
Wordpress has many built-in plug-in that enables this feature easily. But Google Blogger users have to do this manually by editing their blog's template. It is not a difficult task and if you know a little bit of HTML/XML then it takes a few minutes. You need to follow these steps in order to make it happen:


  • First of all, I recommend you to take backup of your current template so that you can avoid any loss.
  • For backup, go to your Blogger dashboard. Click on template and thenBackup/Restore on top-right side. Click on download full template and save it to your computer.
  • Now that you have taken the back up, it is time to choose a facebook button. Visit Facebook Developers page, it will show like the one below:
Add Facebook like button in every Blogger Post

  • Enter the Facebook page URL and customize your like button style.
  • If you don’t want the send button to appear with the like button, uncheck the send button from above form.
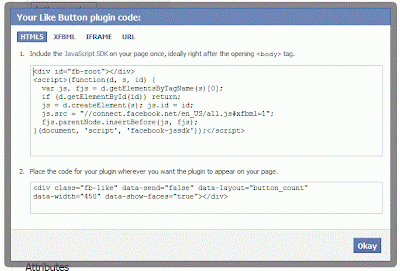
  • When you are done with the customization, you need to click on get code. It would pop-up a window like this one: 

  • Now copy the code shown above, it is the JavaScript code you need to put in the <body></body> tag. Press CTRL+F to find <body> and paste this code just below it.

Update: Those who are unable to find the body tag like <body>, they should try to find it like this <body>


  • Now copy the second code, if you want to put facebook like button at the end of every post you need to find this code first <data:post.body/>, if it is more than once try finding the last one.
  • Just after the last <data:post.body/> put the code you copied from facebook developer page.
  • Click on preview and make sure that everything is fine before saving.
  • Now click on Save Template and view any post. You will find facebook like at the end of every post.
  • If you want to put the like button in the beginning of every post you need to follow the same procedure but put the second code after this line
<div class='post-body entry-content' expr:id='&quot;post-body-&quot; + data:post.id' itemprop='articleBody'> instead of <data:post.body/>.
You can use both of them as well for displaying it in the beginning and ending of your Article.

You just inserted Facebook like button in your blogger blog posts. If you face any problem, you can comment here. I will be Glad to help you. I hope this will make your blogging experience better and help you getting likes and traffic.
 If you like my work; you can show your regards by hitting Facebook like button, following us on Google+ or Twitter, stumbling our posts on stumble upon . Stay tuned for more tech updates.

If You Like My Post Please Share It. !


Read More
// // 1 comment

How to Add Facebook Slide Likebox

How to Add Facebook Slide Likebox
Add Facebook Sliding Like Box with jQUERY To blogger blog. Would be not wrong if I say you already use facebook like box for your facebook page at your website/blog. But they don’t have any kind of effect they just live at your website/blog like a simple widget. It’s about how to add a pop out facebook like box with slide effect. I found a script online that adds a floating Facebook button to right side of your blogs or websites. The button upon clicking slides towards left revealing a Facebook Like Box. It is an excellent coded slider that Hides the Likebox inside a container and reveals it only when visitors hovers the cursor on the floating button.

Add Like Box To Blogger Blog

1. Go To your Blogger Dashboard>>Template>> Edit HTML
2. and click on HTML Code then press CTRL+F and Find the Following code.
</head>

3. and paste the following jquery link before </head>
<script src="https://ajax.googleapis.com/ajax/libs/jquery/1.8.2/jquery.min.js"></script>
4. Find the following code.
</body>
5. and paste the following code before/above </body>

<style type='text/css'>/*<![CDATA[*/#fbplikebox{display: block;padding: 0;z-index: 99999;position: fixed;}.fbplbadge {background-color:#3B5998;display: block;height: 150px;top: 50%;margin-top: -75px;position: absolute;left: -47px;width: 47px;background-image: url('https://blogger.googleusercontent.com/img/b/R29vZ2xl/AVvXsEjOMFgjuoPqbj6-qi9hR4Dl5np6Ghgw2UqmYzSzYizkDcDii0_QHx5SjAhbEe9CB2KCfvp2COlnEaDQW-6z4kMsuLStYpYj09tyKlkUW7DsMOvfLb4JNJD7WFulfYYu5h0SOVjMVclGWI_6/s1600/w2b_vertical-right.png');background-repeat: no-repeat;overflow: hidden;-webkit-border-top-left-radius: 8px;-webkit-border-bottom-left-radius: 8px;-moz-border-radius-topleft: 8px;-moz-border-radius-bottomleft: 8px;border-top-left-radius: 8px;border-bottom-left-radius: 8px;}/*]]>*/</style><script type='text/javascript'>/*<![CDATA[*/(function(w2b){
        w2b(document).ready(function(){
            var $dur = 'medium'; // Duration of Animation
            w2b('#fbplikebox').css({right: -250, 'top' : 350 })
            w2b('#fbplikebox').hover(function () {
                w2b(this).stop().animate({
                    right: 0
                }, $dur);
            }, function () {
                w2b(this).stop().animate({
                    right: -250
                }, $dur);
            });
            w2b('#fbplikebox').show();
        });
    })(jQuery);/*]]>*/</script><div id='fbplikebox' style='display:none;'> <div class='fbplbadge'></div> <iframe src='http://www.facebook.com/plugins/likebox.php?href=http%3A%2F%2Ffacebook.com%2FInfoBlogMaz&amp;width=250&amp;height=260&amp;colorscheme=light&amp;show_faces=true&amp;border_color=%23C4C4C4&amp;stream=false&amp;header=false' scrolling='no' frameborder='0' style='border:none; overflow:hidden; width:250px; height:260px;background:#FFFFFF;' allowtransparency='true'></iframe></div> 

http://www.facebook.com/plugins/likebox.php?href=http%3A%2F%2Ffacebook.com%2FInfoBlogMaz&amp

6. Replace “InfoBlogMaz” with you facebook page user name highlighted above in blue.
7. Click on save button and take your blog new look.

Visit your Blogs to see it floating at the right side of your webpage. If you wish to change the direction, width, height, background. of the Likebox or make the image changes then do let me know.

If You Like My Post Please Share It. !
Read More